 青衿AI
青衿AI使用Flutter开发跨平台应用
<!--more-->Flutter是由Google开发的开源的跨平台应用开发框架,支持Android、iOS开发,能够开发媲美原生的高性能应用。按照2019年的开发路线图,Flutter即将支持Web和桌面端应用的开发。这篇文章带你领略Flutter的魅力。
已经有ReactNative了,为什么还要Flutter
ReactNative已经能够做到使用一份JavaScript代码同时发布Android和iOS平台。而且其并不使用WebView,而是将React组件转换为相应的原生组件从而提高性能。
ReactNative技术看起来很美好,因为对公司而言,并不需要很多的Android和iOS开发,只需要一两个技术支持,其它业务代码都是由前端工程师完成,节约了成本(?)提高了效率(?)。
然而,最近越来越多的公司开始放弃ReactNative而回归到原生开发,原因在于,当ReactNative实际应用到大型项目上时,面对复杂的、定制化的需求,其自带封装好的组件往往不能满足要求。为了满足这些需求,往往需要原生开发去定制相应的React组件。或者为JS提供接口。原生很简单就能实现的功能,因为要跨平台,所以必须抽象出来给React使用。此时React带来的收益和成本相比不再显得有优势了。
Flutter的优势在于,它完全抛弃了使用原生UI,而是从底层2D渲染就独立出来。使用了Google开发的叫Skia的C++渲染库。类似于游戏引擎一样,能够提供60FPS的性能。上层使用Dart提供了一套现代的响应式布局框架。抛弃了原生组件,同时也就免去了原生组件的定制。定制UI也是在Flutter框架的范围内,不涉及原生开发。
这就是Flutter的魅力所在。
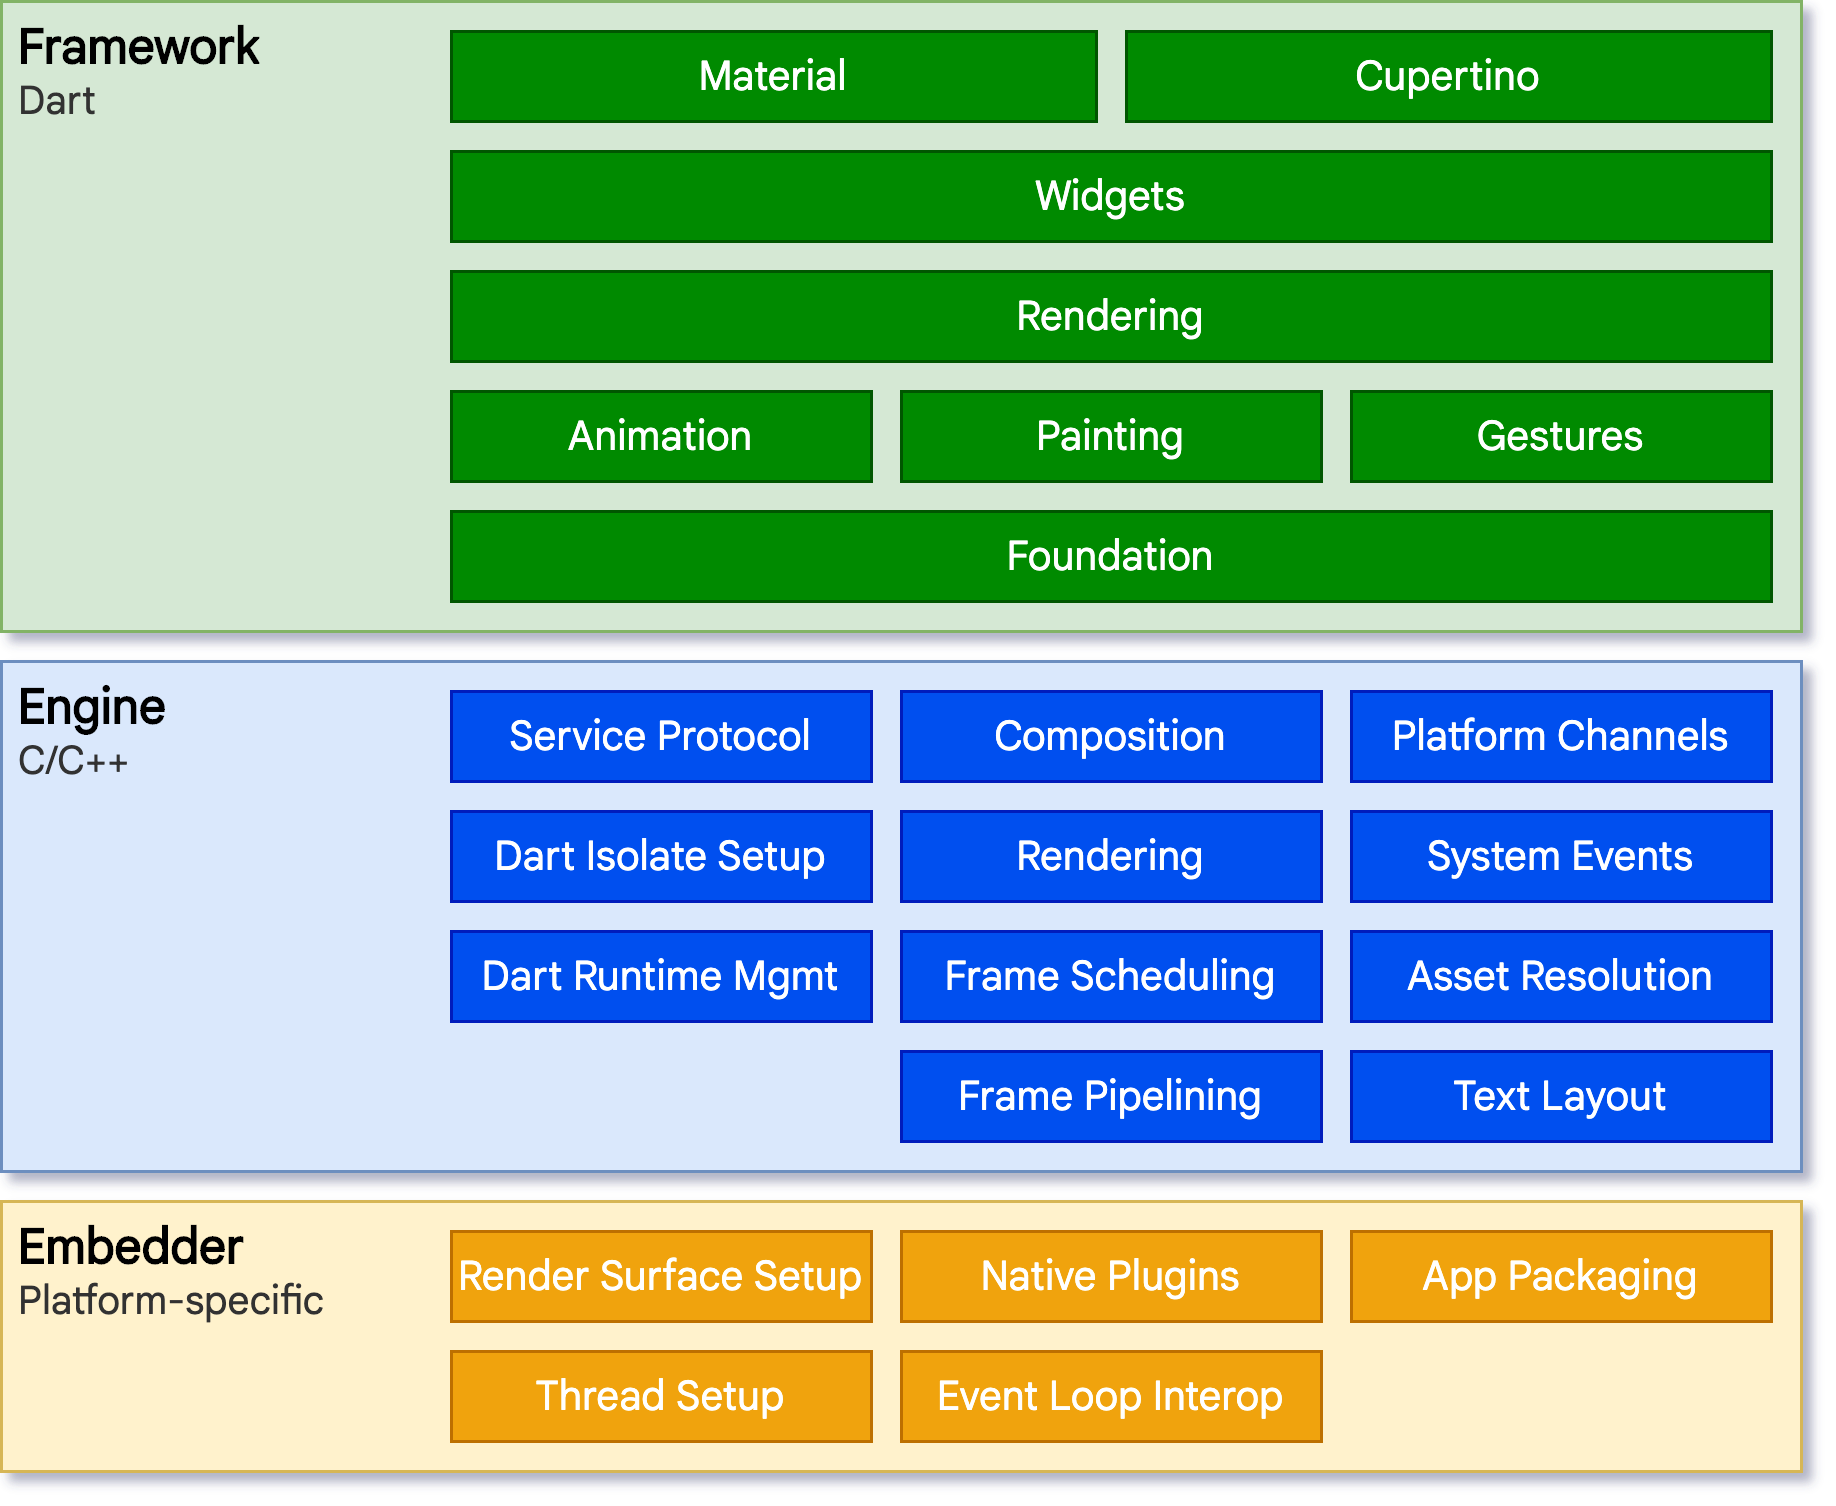
Flutter技术架构
关于环境搭建
环境搭建官网都有说明,我这里不再赘述,需要注意的是,下载并配置好Flutter之后,要执行一个flutter doctor的命令,这个命令会检查本地环境,在线安装所需要的组件。由于众所周知的原因,国内使用我们需要额外配置两个类似仓库镜像的环境变量:
$ export PUB_HOSTED_URL=https://pub.flutter-io.cn
$ export FLUTTER_STORAGE_BASE_URL=https://storage.flutter-io.cn
然后再执行flutter doctor就能快一点了。
Hello Flutter
创建好第一个Flutter工程后,模版代码注释非常详细,Android部分看到只有一个Activity继承自FlutterActivity,用代理模式,接管了这个Activity的所有生命周期和事件回调。这些和Unity,ReactNative的原理都一样。以下是Dart部分的代码:
import 'package:flutter/material.dart';

void main() => runApp(MyApp());

class MyApp extends StatelessWidget {
  // This widget is the root of your application.
  @override
  Widget build(BuildContext context) {
    return MaterialApp(
      title: 'Flutter Demo',
      theme: ThemeData(
        // This is the theme of your application.
        //
        // Try running your application with "flutter run". You'll see the
        // application has a blue toolbar. Then, without quitting the app, try
        // changing the primarySwatch below to Colors.green and then invoke
        // "hot reload" (press "r" in the console where you ran "flutter run",
        // or simply save your changes to "hot reload" in a Flutter IDE).
        // Notice that the counter didn't reset back to zero; the application
        // is not restarted.
        primarySwatch: Colors.blue,
      ),
      home: MyHomePage(title: 'Flutter Demo Home Page'),
    );
  }
}

class MyHomePage extends StatefulWidget {
  MyHomePage({Key key, this.title}) : super(key: key);

  // This widget is the home page of your application. It is stateful, meaning
  // that it has a State object (defined below) that contains fields that affect
  // how it looks.

  // This class is the configuration for the state. It holds the values (in this
  // case the title) provided by the parent (in this case the App widget) and
  // used by the build method of the State. Fields in a Widget subclass are
  // always marked "final".

  final String title;

  @override
  _MyHomePageState createState() => _MyHomePageState();
}

class _MyHomePageState extends State<MyHomePage> {
  int _counter = 0;

  void _incrementCounter() {
    setState(() {
      // This call to setState tells the Flutter framework that something has
      // changed in this State, which causes it to rerun the build method below
      // so that the display can reflect the updated values. If we changed
      // _counter without calling setState(), then the build method would not be
      // called again, and so nothing would appear to happen.
      _counter++;
    });
  }

  @override
  Widget build(BuildContext context) {
    // This method is rerun every time setState is called, for instance as done
    // by the _incrementCounter method above.
    //
    // The Flutter framework has been optimized to make rerunning build methods
    // fast, so that you can just rebuild anything that needs updating rather
    // than having to individually change instances of widgets.
    return Scaffold(
      appBar: AppBar(
        // Here we take the value from the MyHomePage object that was created by
        // the App.build method, and use it to set our appbar title.
        title: Text(widget.title),
      ),
      body: Center(
        // Center is a layout widget. It takes a single child and positions it
        // in the middle of the parent.
        child: Column(
          // Column is also layout widget. It takes a list of children and
          // arranges them vertically. By default, it sizes itself to fit its
          // children horizontally, and tries to be as tall as its parent.
          //
          // Invoke "debug painting" (press "p" in the console, choose the
          // "Toggle Debug Paint" action from the Flutter Inspector in Android
          // Studio, or the "Toggle Debug Paint" command in Visual Studio Code)
          // to see the wireframe for each widget.
          //
          // Column has various properties to control how it sizes itself and
          // how it positions its children. Here we use mainAxisAlignment to
          // center the children vertically; the main axis here is the vertical
          // axis because Columns are vertical (the cross axis would be
          // horizontal).
          mainAxisAlignment: MainAxisAlignment.center,
          children: <Widget>[
            Text(
              'You have pushed the button this many times:',
            ),
            Text(
              '$_counter',
              style: Theme.of(context).textTheme.display1,
            ),
          ],
        ),
      ),
      floatingActionButton: FloatingActionButton(
        onPressed: _incrementCounter,
        tooltip: 'Increment',
        child: Icon(Icons.add),
      ), // This trailing comma makes auto-formatting nicer for build methods.
    );
  }
}